Building a simple, beautiful music player with a Raspberry Pi Touch Display 2
I have a dream: a Sonos-style multi-room speaker setup that will allow me to listen to my music library, but it must be…
- compatible with my self-hosted Navidrome music library[1]
- controllable from any device
- total local and independent of any subscription service
- based on free and open-source software as much as possible
Fortunately, the Music Assistant plugin for Home Assistant (an offline, self-hosted smart home hub) makes this an achievable reality. I’m not going to write a full Music Assistant guide here — there’s plenty of smarter, more informed people out there who have already put out step-by-step guides and videos — but I am going to share some neat little automations I set up for my specific configuration in hopes that it might help others. This post assumes you already have Home Assistant and Music Assistant running; my Music Assistant pulls from my Navidrome library, but this probably will work with whatever service you connect it to (even Spotify).
Here’s the hardware I’m using:
| Device | Price (USD, rounded) |
|---|---|
| Edifier R1280T Speakers | $100 - $150 |
| Raspberry Pi 5 | $80 for 1GB model (inc. power cord and SD card) |
| Touch Display 2 (7") | $55 |
| Pibow Frame for Touch Display | $20 |
| WiiM Pro Plus | $220 |
| Total | $525 |
This sounds like a lot of money, but there’s a lot of asterisks to note:
- I already had the speakers; I use them with my record player and the WiiM is hooked up to their second input. You can use any speakers you like, assuming they accept a standard audio line in.
- A Raspberry Pi 4 would work fine; they’re compatible with the Touch Display 2 and TouchKio too. I used the Pi 5 because it’s what I had on hand, but if you have a Pi 4 laying around or can find one for cheaper than a Pi 5, it will handle this project no problem.
- If you have a 3D printer, you can print your own stand for the Touch Display instead of buying one.
- The WiiM Pro Plus — by far the biggest ticket item — is completely optional. Originally, I was running the Pi with a DAC Pro HAT to drive the speakers and a headless Plexamp player. When I switched away from Plex to Navidrome and Music Assistant, I took apart the Pi to access the SD card and reinstall the OS, and I somehow broke the HAT in the process. I found a good deal on the WiiM used and I wanted to try out their products, but you can easily run this entirely with the Pi’s audio out (though I’d really recommend a DAC HAT for better sound output).
Therefore, depending on how fancy you want to get with your speakers, you could probably pull this off for less than $150 — especially if you browse the used market.
Setting up the Pi
You’ll need to connect the Touch Display 2 to your Pi. The instructions that come in the box are good for the physical connection, but I recommend checking the official documentation for some additional software tweaks (i.e. setting your desired display orientation and enabling the on-screen keyboard). I would also recommend making sure you can SSH into the Pi when you set it up (or use Raspberry Pi Connect). You could hook up a keyboard and mouse and just use the Touch Display, but it’s really quite small and unpleasant to use for terminal commands.
Once you have the Pi up and running, the next tool used is TouchKio, an app that, upon startup, will automatically launch a touch-friendly and highly configurable Home Assistant browser kiosk on the Pi. I discovered this tool through The Stock Pot, who created a sleek, wall-mounted Home Assistant control panel using this same configuration. I’m just focused on music for this project right now, but there are wide possibilities.
TouchKio is a breeze to set up, especially if you already have a MQTT broker set up in Home Assistant (if you don’t, Home Assistant has a guide on how to do so). From there, you just need to run the TouchKio install script on your Pi, and it will walk you through some basic configuration.
bash <(wget -qO- https://raw.githubusercontent.com/leukipp/touchkio/main/install.sh)Assuming you set it up correctly, you should now be able to access the TouchKio device in Home Assistant via the MQTT integration (Settings > Devices & services > MQTT). I made a few minor configuration changes here, like making sure the kiosk would launch in fullscreen mode, enabling dark mode, and setting the page zoom to 150%. That’s all dependent on personal preference — play around and see what you like. Critically, however, the device allows us to set the Page Url that the kiosk will display when it launches. If you’re setting up some kind of control panel (like in The Stock Pot’s video), you probably just want this to be your Home Assistant dashboard (maybe even a custom one for this display). For me, however, I want this to be the fullscreen Music Assistant player.
http://192.168.1.4:8095/#/discover?player=sunroom&showFullscreenPlayer=trueReplace the IP address with the IP for your Home Assistant, of course (homeassistant.local would probably work too). Keep the port as 8095; you access Home Assistant through 8123, but the Music Assistant frontend uses 8095 (unless you’ve configured this differently, but you would probably know if you had). Set the player argument to the name of your player or true for your last used player (per the MASS docs here).
Start playing some music via Music Assistant to your preferred player and take a look at your TouchKio. It should look something like this.
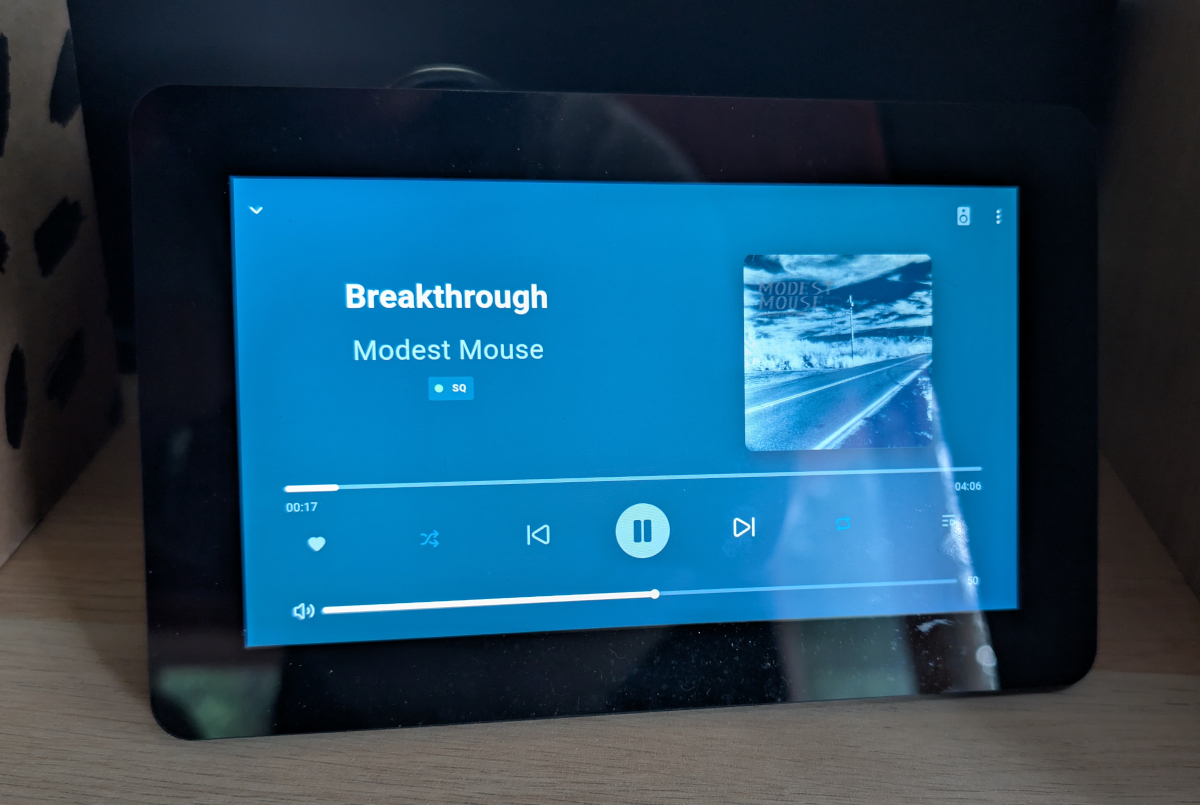
You could feasibly stop here; you can control the music from the touchscreen or from any device where you have access to Home Assistant. I took things a little further by integrating the WiiM as a player within Home Assistant and setting up some automations to make things feel a little more “smart.” As I stated in the price breakdown, the WiiM is a totally optional part of this project.[2]
Automations
As currently configured, the TouchKio screen will be on all the time. That didn’t bother me, but my partner complained, so I set up two separate automations within Home Assistant (Settings > Automations & scenes). You could use the built-in Raspberry Pi screen wake settings to automatically turn the screen off after an interval of time and then wake it on touch, but I want my player to show what’s playing even if I don’t touch the screen — i.e. if I trigger play from another a device.
Turn the display off when no music is playing
The first automation checks if there’s any music playing; if the player is paused or stopped for ten minutes and the display is on, then the display turns off.
alias: Turn off display if music is paused for 10 minutes
description: ""
triggers:
  - trigger: media_player.paused_playing
    target:
      device_id: da72b6a1755a9c380dcb730e4f25428a
    options:
      for:
        hours: 0
        minutes: 10
        seconds: 0
      behavior: each
  - trigger: media_player.stopped_playing
    target:
      device_id: da72b6a1755a9c380dcb730e4f25428a
    options:
      for:
        hours: 0
        minutes: 10
        seconds: 0
      behavior: each
conditions:
  - condition: state
    entity_id: light.touchkio_raspberrypi_display
    state:
      - "on"
actions:
  - type: turn_off
    device_id: 59a39d6bfbf5de890ea9d4de0bd90283
    entity_id: 9fe07a9e153f6b9a7265713618573488
    domain: light
mode: single
Make sure you select your correct entity_ids and device_id. I’d recommend pasting in the code above (create an automation, click the three dots at the top right, and choose Edit in YAML) then switch back to the visual editor where you can easily search for the correct devices.
Turn the display on when music starts
Now that we have the screen turning off, we need a way to automatically turn it back on. This automation is basically the inverse of the previous, with one addition.
alias: TouchKio - Turn on display when sun room plays
description: ""
triggers:
  - trigger: media_player.started_playing
    target:
      device_id: da72b6a1755a9c380dcb730e4f25428a
    options:
      behavior: each
conditions: []
actions:
  - type: turn_on
    device_id: 59a39d6bfbf5de890ea9d4de0bd90283
    entity_id: 9fe07a9e153f6b9a7265713618573488
    domain: light
  - action: text.set_value
    metadata: {}
    target:
      entity_id: text.touchkio_raspberrypi_page_url
    data:
      value: >-
        http://192.168.1.4:8095/#/discover?player=sunroom&showFullscreenPlayer=true
    enabled: false
  - if:
      - condition: not
        conditions:
          - condition: text.is_equal_to
            target:
              entity_id: text.touchkio_raspberrypi_page_url
            options:
              behavior: any
              for: "00:00:00"
              value: >-
                http://192.168.1.4:8095/#/discover?player=sunroom&showFullscreenPlayer=true
    then:
      - action: text.set_value
        metadata: {}
        target:
          entity_id: text.touchkio_raspberrypi_page_url
        data:
          value: >-
            http://192.168.1.4:8095/#/discover?player=sunroom&showFullscreenPlayer=true
mode: single
Again, you’ll need to bind this to your correct devices and entities. An additional action at the end sets the kiosk’s Page Url back to what we configured before just in case someone was using the touch display previously to change playlists, search for a song, etc. — when play starts, show the full-screen player. Again, make sure you adjust the IP address appropriately.
Trigger Music Assistant playlists from WiiM remote
The WiiM Pro Plus includes a remote with four preset buttons. In the WiiM app, you can configure these buttons to play a certain playlist, artist, song, etc. from one of their supported music services. Unfortunately, Music Assistant is not among these services, so we have to get a little creative.
I did some searching and found a post on the WiiM forums where a community member provided a YAML script that would listen for a webhook, triggered by a WiiM preset (either in the app or through the remote), then play a corresponding Music Assistant playlist. The poster provided the following disclaimer:
I asked Google AI and it came up with this set of instructions and YAML code you’d need to include in your Home Assistant automations.yaml to expose Music Assistant playlists via a url you could add to the WiiM app Open Network Stream and then to a preset. I haven’t tested this at all so “caveat emptor” ;)
Unfortunately, the script they provided didn’t work for me, and I don’t think AI is fully to blame — Music Assistant has changed the mass.play_media action to music_assistant.play_media. I’ll now provide my own disclaimer that I used the Google AI to help me troubleshoot update the script.[3] because I had no idea what was going wrong. Hopefully by sharing the script publicly here, I can stop anyone else from using AI to achieve the same use case.
Here’s my automation script, which includes some additional customizations:
alias: Multi-Playlist WiiM Preset
description: Plays any Music Assistant playlist passed via URL parameter
triggers:
  - trigger: webhook
    webhook_id: play_ma_playlist
    allowed_methods:
      - GET
      - POST
    local_only: true
actions:
  - action: media_player.shuffle_set
    target:
      entity_id: media_player.sun_room_4
    data:
      shuffle: true
  - action: media_player.repeat_set
    target:
      entity_id: media_player.sun_room_4
    data:
      repeat: all
  - action: music_assistant.play_media
    target:
      entity_id: media_player.sun_room_4
    data:
      media_id: "{{ trigger.query.name | default('') }}"
      media_type: playlist
      enqueue: replace
mode: single
Generally speaking, this is what happens when the webhook is triggered:
- Music Assistant is set to shuffle and repeat all.
- Music Assistant looks for the playlist specified by the webhook and plays it.
Music Assistant is therefore set to listen for these webhooks; now we need to set up the WiiM to issue the webhook when a button is pressed (either on the remote or via the app).
In the WiiM app, select Browse and then, under Music Services, select Open Network Stream. The title, description, and artwork can be whatever you want (I’m using the name of the playlist). Under Stream URL, add something like this:
http:/api/webhook/play_ma_playlist?name=44Again, set the IP address to your Home Assistant server. Additionally, the name argument can be either the title of your playlist or the playlist ID that you want to trigger. My playlist titles are often multiple words and sometimes include emojis, so I’m keeping it simple and using a numeric ID. You can find the ID of your playlist by opening it in Music Assistant, scrolling to the bottom, and checking under Provider Details.
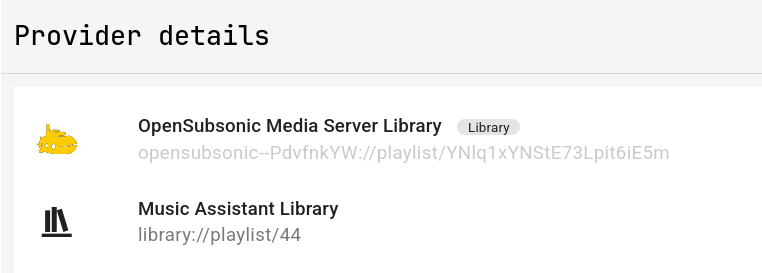
The ID is the number listed after library://playlist/ (in my case, I’m using my playlist of favorite tracks, which is 44).
Assign this network stream to one of your presets and you’ll be able to trigger the playlist from your remote or app. You’ll need to add a new Open Network Stream and corresponding URL for each playlist preset you want to create, but you only need to make the Home Assistant automation once.
Update (2026-07-31): I found that my WiiM remote’s forward and back buttons were not working because the Music Assistant queue was not surfacing to the WiiM app (which powers the remote). To fix this, I first ensured that I was using the correct entity in my automation script by going to Settings > Developer tools > States in Home Assistant and making sure I saw the following for media_player.sun_room_4:
app_id: music_assistant
source: Music Assistant Queue
For whatever reason, Home Assistant, WiiM, or Music Assistant all create different player entities, so it can be tricky to ensure you have the correct one. After that, I went into Music Assistant’s Settings > Players > Sun Room (or whatever your WiiM Player is). Under Preferred Output Protocol, I switched from the default WiiM option to AirPlay. After that, my remote was working properly.
Conclusion
I’m really happy with how this project turned out. It looks relatively simple and fairly indistinguishable from an off-the-shelf smart speaker and display (e.g. Google Nest Hub, the Amazon Echo line, etc.), but with all the advantages of Home Assistant: it’s local. It’s mine. It’s playing from my music library. No one can take it away from me.[4] Best of all, it’s easy enough for anyone in the house to use — my partner has the Home Assistant app on his phone, and there’s a physical remote for anyone who just wants to play something (or when we don’t want to pull out our phones). There are definitely future improvements in the pipeline — I want to eventually replace my existing Google Home voice assistants with Home Assistant, and I can build in some cool voice commands that work in tandem with this setup. I’d also like to get a motion or presence sensor in the room that can also wake the screen, but I’m prioritizing more critical devices right now (i.e. lights) with my smart home budget. Finally, I’d also like to set up more speakers and screens throughout the house that synchronize with this setup for whole-house audio (when I want it — or individually controllable speakers for whoever is inhabiting the room at the time).
If you have any suggestions for improvement or if you build a similar setup using this guide, please do drop me a line! I’d love it if this post inspires someone to replace the shovelware shit that companies like Amazon sell you to trap you in their ecosystem and steal your data then become ewaste in a few years when the company decides to stop supporting it.
fuck Spotify, Apple Music, YouTube Music et al. ↩︎
The only real advantages are the remote (for which I set up an automation; you could easily just add a button to your HA dashboard or use a smart button) and that the WiiM is castable, so I can send something like a podcast app to this speaker too. Music Assistant supports podcasts, though, so maybe I can build that out later. ↩︎
I generally think AI is a moral, intellectual, artistic, and environmental blight and do not use it. I also feel it’s important for me to explicitly mention if and when I do use it. I’m still learning my way around Home Assistant automations, and I don’t think I’d have been able to get this working on my own. I’m making excuses for myself, but I also think that it’s a compromise I made in pursuit of a greater good: platforms like Spotify are infiltrated by AI bullshit and anyone who uses them these platforms is complicit in the harm that AI causes. My use of AI was in service of cutting out services like that and having something that runs on my hardware with my local music collection — no evil corporations involved. ↩︎
The one cog in this machine that gives me a little anxiety is WiiM; I don’t know much about them as a corporation, but they are an official Home Assistant partner, which bodes well. If they ever shut down the device or app (which I use just to initially configure the presets), I could pretty easily move back to a Pi with a DAC HAT as the player and figure out some other custom solution for a remote. ↩︎